What's New? |
Helpful tips and advice for home maintenance from your roof to your porch.
|
12/27/2016
Roofing installation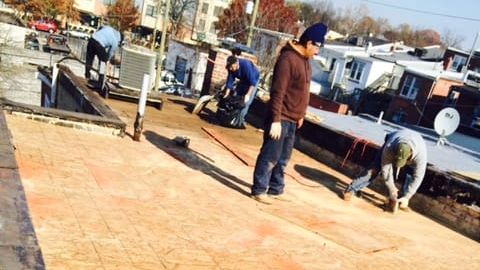 Should you do it yourself?Make no bones about it—roofing is hard work. There's no hiding from the elements. You can't be afraid of heights and you need to be pretty fit. Before committing to this project, try this: Get out a ladder and climb up onto your roof. If you can't walk around on it comfortably, hire a pro. If you passed this first test, go to the lumberyard or home center and throw a bundle of shingles onto your shoulder. Imagine yourself carrying that load up a
ladder…many, many times. If you're still feeling positive at this point, why not give it a shot? You can skip a lot of heavy lifting by having your roofing supplier hoist the shingles onto the roof. Be sure you spread the load evenly across the length of the roof's peak. However, don't have the shingles delivered to the roof if you have two layers of old shingles yet to tear off—it could be too much weight for your trusses. After you've obtained a permit (if needed) and safely stripped the roof clean, nail drip edge flashing flush along the eave. Windblown heavy rain and/or snow can force water up and under even properly installed shingles. Even worse are ice dams (frozen water/snow that builds up on roof edges), which can wreak havoc by allowing water to seep up under lower shingles and then drip into your house. To guard against such seepage, apply self-adhesive waterproof underlayment (“ice barrier”), which adheres tightly to bare roof sheathing and seals around nails driven through it. Buy it at roofing supply companies or home centers. In severe climate regions, most building codes require applying it 3 to 6 ft. up from the eave (minimum of 2 ft. past the exterior wall). Call your building inspector for local details. Cover the rest of the roof with No. 15 asphalt-saturated felt underlayment (some codes may require No. 30). Each layer overlaps the lower one by at least 2 in. Follow this step by nailing drip edge along rakes (sides of roof), on top of the underlayment. As you did with the flashing, always lap upper pieces over lower pieces. The felt keeps the roof deck dry before shingles go on, protects against wind-driven rain as shingles fail and increases fire resistance. Next, find the center of the roof at the top and the eave, then snap a vertical chalk line. Most pros use this line to begin shingling, working left and right toward the rakes. Shingle manufacturers may recommend starting at the left rake edge, so check package recommendations. For the first row of shingles, called a starter course or strip, you cut the tabs off three-tab shingles and apply them with the self-sealing adhesive strip facing up along the eave. Make sure this row has a slight overhang (1/4 to 3/8 in.) beyond the drip edge. The starter course protects the roof by filling in the spaces under the cutouts and joints of the next row (first course) of shingles. The adhesive on the starter course seals the tabs of the first full course. Finally, nail the first course of shingles directly on top of and flush with the starter course. Use four roofing nails per shingle, as indicated on package instructions (six nails in high-wind areas). Once this course is laid, you can begin snapping horizontal chalk lines up the roof to ensure straight rows. Make sure to expose 5 in. of the shingle tabs where the bottom edge of the tab meets the top of the cutout.
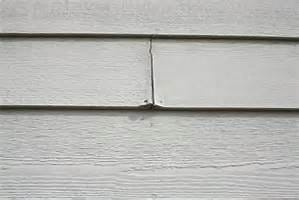
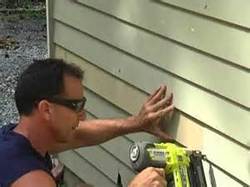
If you have this problem, you might want to consider replacing the rotten courses of hardboard siding with more durable fiber cement siding. Fiber cement siding is available in the same look and dimensions as hardboard siding but is more resistant to water damage. Consult with a professional in your area, like Boyd Construction Co Inc in the DC area, for a free estimate. Some helpful tips for those that would like to venture into the DIY of siding repair:
How to Remove and Replace Siding:
12/17/2016
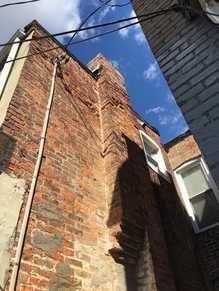
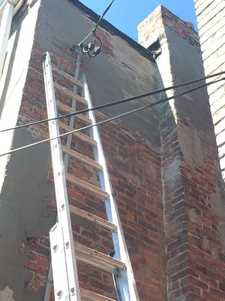
Repoint brick walls and repair: How to
Step 1: Remove The Old Mortar Repointing is all about out with the old and in with the new—and working in small sections. You don’t want to remove all of the old mortar from a wall at once, because you may weaken its integrity. So, working along the wall in an area about three- to five-feel wide, remove the old mortar from both the horizontal and vertical joints. To ensure you don’t damage the bricks, you can use a cold chisel or handheld grout saw to tap it out. You can also use another hand tool known as a joint raker. If you’re confident in your abilities, you can use a 4-inch angle grinder, but be careful not to cut into the brick. You’ll want to remove the mortar to a depth of about 1/2 inch. Use a whisk broom, wire brush or hose to remove all the dust and wear a respirator to keep debris out of your lungs.
Step 3: Mix The New Mortar If your house is less than 50 years old, you will likely be safe using standard portland cement mortar to refill the spaces between your bricks. If your abode is older than that however, you’ll want to use a different mix, consisting of lime and sand. This is what was originally used in brickwork and it’s best to use the same mix as a replacement. That’s because portland cement mortar is very hard when it dries and can cause older bricks to crack. The lime mix acts almost like disks between vertebrae in the spine: it cushions the brick and moves along with the wall as it flexes. Otherwise, a general rule of thumb is to make a mortar mix from 6 parts fine white sand, 2 parts lime and 1 part white portland cement.  Step 3: Insert The New Mortar
Pick up some mortar on a large trowel and then, using a pointing trowel, work smaller amounts into the horizontal and vertical gaps between the bricks. You might find it easier to fill the vertical joints with a tool known as a margin trowel. Use the flat edge of the trowel to even out your work and scrape off any mortar you get on the face of the bricks. Step 4: Clean Up Wait about an hour until the mortar has hardened a bit, then scrape off any mortar that’s remained on the brick face. You can do this with a sturdy wire brush, but be sure to use a horizontal sweeping motion so as to not pull the new mortar out of the joints. For the next three to four days, give the wall a daily misting to allow the mortar to dry slowly and not crack. Still not quite sure this is something you want or need to do on your own, contact a professional in your area like Boyd Construction Co Inc, servicing the greater Washington DC area for a free consultation. |
Boyd Construction CoFamily owned and operated in the greater Washington DC area since 1932. Archives
September 2019
|
 RSS Feed